Testing Downloading Files in IE9 via Selenium

After some recent Certified ScrumMaster training with AxisAgile, I’ve been really challenged to beef up my integration testing Kungfu. I’ve always found Selenium a little cumbersome from an API viewpoint, but I’ve recently discovered Selenide and have become a huge fan of (IMHO) the cleaner and more concise Selenide API.

But one recent snag I’ve hit was around downloading files in Internet Explorer 9. There is no popup dialog any more, only an in-window “Download Manager” (scan for the term here). Turns out you can get access to this window via Alt+N, so if you’re driving via a java.awt.Robot, that’s the magic you’ll need.

A good discussion of several approaches to the problem can be found on StackExchange,  and I’ve tweaked StatusQuo’s solution there to make things play nice with the new IE9 Download Manager magic:

public void clickAndSaveFileIE(WebElement element) throws AWTException, InterruptedException {

    Robot robot = new Robot();

    // Get the focus on the element..don't use click since it stalls the driver          
    element.sendKeys("");

    //simulate pressing enter            
    robot.keyPress(KeyEvent.VK_ENTER);
    robot.keyRelease(KeyEvent.VK_ENTER);

    // Wait for the download manager to open            
    Thread.sleep(2000);

    // Switch to download manager tray via Alt+N
    robot.keyPress(KeyEvent.VK_ALT);
    robot.keyPress(KeyEvent.VK_N);
    robot.keyRelease(KeyEvent.VK_N);
    robot.keyRelease(KeyEvent.VK_ALT);

    // Press S key to save            
    robot.keyPress(KeyEvent.VK_S);
    robot.keyRelease(KeyEvent.VK_S);
    Thread.sleep(2000);

    // Switch back to download manager tray via Alt+N
    robot.keyPress(KeyEvent.VK_ALT);
    robot.keyPress(KeyEvent.VK_N);
    robot.keyRelease(KeyEvent.VK_N);
    robot.keyRelease(KeyEvent.VK_ALT);

    // Tab to X exit key
    robot.keyPress(KeyEvent.VK_TAB);
    robot.keyRelease(KeyEvent.VK_TAB);

    robot.keyPress(KeyEvent.VK_TAB);
    robot.keyRelease(KeyEvent.VK_TAB);

    robot.keyPress(KeyEvent.VK_TAB);
    robot.keyRelease(KeyEvent.VK_TAB);

    // Press Enter to close the Download Manager 
    robot.keyPress(KeyEvent.VK_ENTER);
    robot.keyRelease(KeyEvent.VK_ENTER);

}


A bit of magic around the Alt+N, a few strategic tabs, and you’re off and running. And if you need to get access to the actually downloaded file, then a little strategic pre-fetch deleting and asserting over your downloads directory…

File downloadsDir = new File(System.getenv("USERPROFILE") + File.separator + "Downloads");

and you can have a look at how the download file turned up!

Not as elegant as the very cool Apache Client/Cross-browser/Cookie-switching magic found on this blog, but for a quick IE9 smoke test, Robot works a treat!

Oh, and if you haven’t already, you should definitely check out Selenide

[Read More]

What's in the pipe for Grails in Action 2?

It’s been a while coming, but this book is now really starting to hot up!

I’ve written over 75 pages in the last week putting together Chapter 13 (on single page webapps with AngularJS), and Chapter 17 (on Leveraging NoSQL from Grails where we cover off Redis, MongoDB and Neo4j). You won’t believe how much fun I’ve been having!

So what’s in the two new chapters?

Chapter 13: Single Page Web Applications

Just finished the first cut of this one today. Presently 26 pages. In here we’ll cover off:

  • All the basics of the Resources plugin to drag in your CSS/JS and dependencies
  • Working with AngularJS controllers and data binding
  • Interacting with the Hubbub RESTful services using Restangular
  • Working with non-standard Payloads while doing GET/POST/PUT/DELETE
  • Cross-controller interactions with AngularJS eventing
  • Lots of AngularJS magic (such as implementing inplace editing and UI magic)

Chapter 17: Leveraging NoSQL from Grails

Finished this one off earlier in the week. Presently 39 pages! In here we’ll cover off:

  • Setting up your own Redis server
  • Working with Redis taglibs and the service (including typical key/value useages)
  • Working with Redis Counters, SortedSets and other interesting structures
  • Setting up your own MongoDB server
  • Modelling embedded documents and their GORM interactions
  • Working with GORM/MongoDB dynamic properties
  • Querying with MongoDB GORM and native MongoDB queries
  • Using GMongo for MongoDB Map/Reduce action
  • Modelling Hubbub Social Graph in Neo4j
  • Querying Friends, and Friends of Friends with Cypher
  • Using the low level Neo4j API to traverse trees
    Wholly Dooley… I hope they don’t cut too much. You’ll go from NoSQL zero to hero!

When, Glen, When?!?!?

[Read More]

Calling PrimeFaces remoteCommand with JavaScript arguments

I’ve been doing a ton of PrimeFaces JSF development over the last little while and that library is one stunning piece of engineering execution. That said, I’m still a JSF noob, and one thing I keep having to look up is how to invoke backend JSF beans from JavaScript using p:remoteCommand. It’s covered in the Primefaces manual, but not in the standard google-able samples AFAIK.

It even ended up in this bug submission, but it’s not really a bug, just something that should be documented in a blog somewhere for quick googling.

Brother Glen will now school you on everything you need to know.

First, write the backing bean Java code to handle the parameters you get invoked from your JS client. You’ll have to parse our the args from a RequestParameterMap, but life is still good…

public void onBrowserStuff() {
    Map<String, String> requestParamMap = FacesContext.getCurrentInstance().getExternalContext().getRequestParameterMap();
    if (requestParamMap.containsKey("yourArg")) {
        String yourValue = requestParamMap.get("yourArg");
        // knock yourself out with yourValue
    }
}

Then, put a p:remoteCommand in your markup so you can invoke that backing method from your JavaScript:

<p:remoteCommand name="onBrowserStuff" actionListener="#{yourBean.onBrowserStuff}"/>

Finally, call the thing with whatever args you may require. These args need to be in an array of name/value hashes, so watch your brackets and braces:

<script type="text/javascript">

$(document).ready(fuction() {

    onBrowserStuff( [ { name: 'yourArg', value: 'yourValue' }, { name: 'yourOtherArg', value: 'yourOtherValue' } ] );

));

</script>

&nbsp;

[Read More]

Glassfish JMS backed by MS SQL Server tables

I know why you’re here. You’re the other person on the planet that is attempting configure Glassfish 3.x to store all your JMS messages in a Microsoft SQL Server database. The good news is that this is totally doable and should be quite quick (for you :-)!

If you were doing all this on PostgreSQL, you’d have this fantastic quickstart to get you going. Sadly for us, Postgresql is one of the blessed few database that has OpenMQ SQL creation scripts bundled with your Glassfish distro (oracle, mysql, derby and hadb are the others), so things are a bit simpler there. You can read about those on the Oracle config page.

So what will we need to do to get this happening for us?

Well, let’s template off that fabulous quickstart, you’ll first need to:

  • Make sure your SQL Server jdbc driver is deployed to your server somewhere (if you’re using the standard MS SQL driver, you would typically have deployed it to c:\glassfish-3.x\glassfish\domains\domain1\lib\sqljdbc4.jar), and if you’re using integrated security, make sure you have sqljdbc_auth.dll somewhere in the path (typically the same folder).

  • Modify c:\glassfish-3.x\mq\etc\imqenv.conf to add the jdbc driver to the OpenMQ path:

    1
    IMQ_DEFAULT_EXT_JARS=../../glassfish/domains/domain1/lib/sqljdbc4.jar
  • Now we need to do some work to tell OpenMQ all about our new mssql server type, so it works just like one of the built in drivers. We do that magic in c:\glassfish-3.x\mq\lib\props\broker\default.properties. If you have a look in there, you’ll see it defines all the driver settings and table schema creation sql that we’ll need to have in play. Go find the section that relates to postgresql, and we’ll use that as a template. It starts with something like:

    1
    2
    3
    #
    # Beginning of properties to plug in a PostgreSQL 8.1 database
    #

    I’ve basically copied and pasted from that header to the end of that section which ends with:

    1
    # End of properties to plug in a PostgreSQL 8.1 database

    Then I rejigged things to be happy for MS SQL Server (bascially changing the BYTEA fields to VARBINARY(MAX) and setup the drivers/etc, rekeying all the property fields to start with imq.persist.jdbc.mssql). I ended up with something like this which I could add below the postgres section (doing all this in notepad here, it might need some tweaking on your machine):

    1
    2
    3
    4
    5
    6
    7
    8
    9
    10
    11
    12
    13
    14
    15
    16
    17
    18
    19
    20
    21
    22
    23
    24
    25
    26
    27
    28
    29
    30
    31
    32
    33
    34
    35
    36
    37
    38
    39
    40
    41
    42
    43
    44
    45
    46
    47
    48
    49
    50
    51
    52
    53
    54
    55
    56
    57
    58
    59
    60
    61
    62
    63
    64
    65
    66
    67
    68
    69
    70
    71
    72
    73
    74
    75
    76
    77
    78
    79
    80
    81
    82
    83
    84
    85
    86
    87
    88
    89
    90
    91
    92
    93
    94
    95
    96
    97
    98
    99
    100
    101
    102
    103
    104
    105
    106
    107
    108
    109
    110
    111
    112
    113
    114
    115
    116
    117
    118
    119
    120
    121
    122
    123
    124
    125
    126
    127
    128
    129
    130
    131
    132
    133
    134
    135
    136
    137
    138
    139
    140
    141
    142
    143
    144
    145
    146
    147
    148
    149
    150
    151
    152
    153
    154
    155
    156
    157
    158
    159
    160
    161
    162
    163
    164
    165
    166
    167
    168
    169
    170
    171
    172
    173
    174
    175
    176
    177
    178
    179
    180
    #
    # Beginning of properties to plug in a MS SQL Server database
    #

    # User name used to open database connection. Replace username.
    #imq.persist.jdbc.mssql.user=&lt;username&gt;

    # Optional property to specify whether the database requires a password.
    #imq.persist.jdbc.mssql.needpassword=[true|false]

    # Vendor specific JDBC driver.
    # imq.persist.jdbc.mssql.driver=com.microsoft.sqlserver.jdbc.SQLServerDriver
    imq.persist.jdbc.mssql.driver=com.microsoft.sqlserver.jdbc.SQLServerDataSource

    # Vendor specific properties.

    # Vendor specific database url to get a database connection.
    # Replace hostname, port and database in imq.persist.jdbc.mssql.opendburl.
    # imq.persist.jdbc.mssql.opendburl=jdbc:sqlserver://localhost:1433;databaseName=glassfish-jms;integratedSecurity=true;
    imq.brokerid=mssql
    imq.persist.jdbc.mssql.property.serverName=localhost
    imq.persist.jdbc.mssql.property.databaseName=glassfish-jms
    imq.persist.jdbc.mssql.property.integratedSecurity=true

    # Properties to define the tables used by the broker. Do not modify the schema.

    # Version table
    imq.persist.jdbc.mssql.table.MQVER41=\
    CREATE TABLE ${name} (\
    STORE_VERSION INTEGER NOT NULL,\
    LOCK_ID VARCHAR(100),\
    PRIMARY KEY(STORE_VERSION))

    # Configuration change record table
    imq.persist.jdbc.mssql.table.MQCREC41=\
    CREATE TABLE ${name} (\
    RECORD VARBINARY(MAX) NOT NULL,\
    CREATED_TS BIGINT NOT NULL,\
    PRIMARY KEY(CREATED_TS))

    # Broker table
    imq.persist.jdbc.mssql.table.MQBKR41=\
    CREATE TABLE ${name} (\
    ID VARCHAR(100) NOT NULL,\
    URL VARCHAR(100) NOT NULL,\
    VERSION INTEGER NOT NULL,\
    STATE INTEGER NOT NULL,\
    TAKEOVER_BROKER VARCHAR(100),\
    HEARTBEAT_TS BIGINT,\
    PRIMARY KEY(ID))

    # Store session table
    imq.persist.jdbc.mssql.table.MQSES41=\
    CREATE TABLE ${name} (\
    ID BIGINT NOT NULL,\
    BROKER_ID VARCHAR(100) NOT NULL,\
    IS_CURRENT INTEGER NOT NULL,\
    CREATED_BY VARCHAR(100) NOT NULL,\
    CREATED_TS BIGINT NOT NULL,\
    PRIMARY KEY(ID))

    imq.persist.jdbc.mssql.table.MQSES41.index.IDX1=\
    CREATE INDEX ${index} ON ${name} (\
    BROKER_ID)
    imq.persist.jdbc.mssql.table.MQSES41.index.IDX2=\
    CREATE INDEX ${index} ON ${name} (\
    BROKER_ID, IS_CURRENT)

    # Destination table
    imq.persist.jdbc.mssql.table.MQDST41=\
    CREATE TABLE ${name} (\
    ID VARCHAR(100) NOT NULL,\
    DESTINATION VARBINARY(MAX) NOT NULL,\
    IS_LOCAL INTEGER NOT NULL,\
    CONNECTION_ID BIGINT,\
    CONNECTED_TS BIGINT,\
    STORE_SESSION_ID BIGINT,\
    CREATED_TS BIGINT NOT NULL,\
    PRIMARY KEY(ID))

    imq.persist.jdbc.mssql.table.MQDST41.index.IDX1=\
    CREATE INDEX ${index} ON ${name} (\
    STORE_SESSION_ID)

    # Interest (consumer) table
    imq.persist.jdbc.mssql.table.MQCON41=\
    CREATE TABLE ${name} (\
    ID BIGINT NOT NULL,\
    CLIENT_ID VARCHAR(1024),\
    DURABLE_NAME VARCHAR(1024),\
    CONSUMER VARBINARY(MAX) NOT NULL,\
    CREATED_TS BIGINT NOT NULL,\
    PRIMARY KEY(ID))

    # Interest list (consumer state) table
    imq.persist.jdbc.mssql.table.MQCONSTATE41=\
    CREATE TABLE ${name} (\
    MESSAGE_ID VARCHAR(100) NOT NULL,\
    CONSUMER_ID BIGINT NOT NULL,\
    STATE INT,\
    TRANSACTION_ID BIGINT,\
    CREATED_TS BIGINT NOT NULL,\
    PRIMARY KEY(MESSAGE_ID, CONSUMER_ID))

    imq.persist.jdbc.mssql.table.MQCONSTATE41.index.IDX1=\
    CREATE INDEX ${index} ON ${name} (\
    TRANSACTION_ID)

    imq.persist.jdbc.mssql.table.MQCONSTATE41.index.IDX2=\
    CREATE INDEX ${index} ON ${name} (\
    MESSAGE_ID)

    # Message table
    imq.persist.jdbc.mssql.table.MQMSG41=\
    CREATE TABLE ${name} (\
    ID VARCHAR(100) NOT NULL,\
    MESSAGE VARBINARY(MAX) NOT NULL,\
    MESSAGE_SIZE INTEGER,\
    STORE_SESSION_ID BIGINT NOT NULL,\
    DESTINATION_ID VARCHAR(100),\
    TRANSACTION_ID BIGINT,\
    CREATED_TS BIGINT NOT NULL,\
    PRIMARY KEY(ID))

    imq.persist.jdbc.mssql.table.MQMSG41.index.IDX1=\
    CREATE INDEX ${index} ON ${name} (\
    STORE_SESSION_ID, DESTINATION_ID)

    # Property table
    imq.persist.jdbc.mssql.table.MQPROP41=\
    CREATE TABLE ${name} (\
    PROPNAME VARCHAR(100) NOT NULL,\
    PROPVALUE VARBINARY(MAX),\
    PRIMARY KEY(PROPNAME))

    # Transaction table
    imq.persist.jdbc.mssql.table.MQTXN41=\
    CREATE TABLE ${name} (\
    ID BIGINT NOT NULL,\
    TYPE INTEGER NOT NULL,\
    STATE INTEGER,\
    AUTO_ROLLBACK INTEGER NOT NULL,\
    XID VARCHAR(256),\
    TXN_STATE VARBINARY(MAX) NOT NULL,\
    TXN_HOME_BROKER VARBINARY(MAX),\
    TXN_BROKERS VARBINARY(MAX),\
    STORE_SESSION_ID BIGINT NOT NULL,\
    EXPIRED_TS BIGINT NOT NULL,\
    ACCESSED_TS BIGINT NOT NULL,\
    PRIMARY KEY(ID))

    imq.persist.jdbc.mssql.table.MQTXN41.index.IDX1=\
    CREATE INDEX ${index} ON ${name} (\
    STORE_SESSION_ID)

    # JMS Bridge TM LogRecord table
    imq.persist.jdbc.mssql.table.MQTMLRJMSBG41=\
    CREATE TABLE ${name} (\
    XID VARCHAR(256) NOT NULL,\
    LOG_RECORD VARBINARY(MAX) NOT NULL,\
    NAME VARCHAR(100) NOT NULL,\
    BROKER_ID VARCHAR(100) NOT NULL,\
    CREATED_TS BIGINT NOT NULL,\
    UPDATED_TS BIGINT NOT NULL,\
    PRIMARY KEY(XID))
    imq.persist.jdbc.mssql.table.MQTMLRJMSBG41.index.IDX1=\
    CREATE INDEX ${index} ON ${name} (BROKER_ID)
    imq.persist.jdbc.mssql.table.MQTMLRJMSBG41.index.IDX2=\
    CREATE INDEX ${index} ON ${name} (NAME)

    # JMS Bridges table
    imq.persist.jdbc.mssql.table.MQJMSBG41=\
    CREATE TABLE ${name} (\
    NAME VARCHAR(100) NOT NULL,\
    BROKER_ID VARCHAR(100) NOT NULL,\
    CREATED_TS BIGINT NOT NULL,\
    UPDATED_TS BIGINT NOT NULL,\
    PRIMARY KEY(NAME))

    # End of properties to plug in a MS SQL Server database

Once again, if you need to deep-dive on all of those property settings, there some good info on the Oracle config page (half way down under the JDBC section).

Ok. Now that we have all our properties good to go, the final step is to create the actual MQ setup in the Glassfish admin console.  Going off our template:

  • Head into the Glassfish admin console (normally http://localhost:4848), then go to Configurations->server-config->Java Message Service->
  • Change your JMS Server type from EMBEDDED to LOCAL in the top section.
  • Then enter the following two properties in the bottom section:
1
2
imq.persist.store=jdbc
imq.persist.jdbc.dbVendor=mssql

The first line tell Glassfish that we’re using a JBDC backing for our JMS service, and the second tells it to retrieve all those default settings from our default.properties using the key imq.persist.jdbc.mssql.

[Read More]

Bracket Well Formedness Quick Quiz

I’ve started a monthly-ish coding quiz on my little Canberra Java Devs Fresh Bytecode Newsletter. But other people might be interested in the odd puzzle they can do in a lunchtime, so I’ll post them here under the Quiz category.

We’ll start with something simple, perhaps a quick and dirty bracket matcher?

Give a series lines containing both well formed brackets (where each opening bracket has a matching closing bracket) and malformed brackets (where there are more opening than closing or the closing appears before the opening, etc), tell me which ones are valid and invalid. So…

( ) is valid

( ) ) is invalid

( ( ) ( ) ) is valid

) (  ) (  is invalid

( ( ( ) ) ( ( ) ) ) is valid

and so on.. it can get quite sneaky, quite quickly, so be warned.

Gold stars for creative solutions (don’t just think performance).

[Read More]

Integrating Spring Security and Platform Core Events

I’ve really fallen in love with eventing architectures of late. Fire and forget, and let some other decoupled class (or classes) listen in and do what makes sense to it. I love the extensibility! And the cleanliness!

I’ve been using a lot of the new EE6 Event stuff and applying these kind of ideas for fun and profit. If only there was a Grails equivalent… and there is! It’s found in the Event Bus features of the amazing platform-core plugin!

I’m currently learning and writing about the eventing features of Platform Core for Grails in Action 2 and been having a great time (the messaging chapter will now be “Events, Messaging and Scheduling” to make sure it’s given good coverage). One of the features that I am experimenting with is integrating Spring Security logon events with an Audit Service that is listening for those events (just to get a feel for how messages flow).

Spring Security already has its own eventing magic, and cute ways to listen in, so I’m really just adapting the stuff that’s already in there. First, we raise the event on the Event Bus by wiring up a listener in Config.groovy:

grails.plugins.springsecurity.useSecurityEventListener = true
grails.plugins.springsecurity.onAuthenticationSuccessEvent = { evt, appCtx ->
    appCtx.grailsEvents.event 'security', 'onUserLogin' , evt
}

In this sample I’m raising a new event, with a “security” namespace, and a “onUserLogin” event, and attaching the incoming AuthenticationSuccessEvent event that Spring Security passes in (so you can have access to the ipaddress or any other security magic you might want).

Now it’s just the small matter of wiring up a listener. Let’s throw together an AuditService to give you a look:

package com.grailsinaction

import org.springframework.security.authentication.event.AuthenticationSuccessEvent

class AuditService {

    @grails.events.Listener(namespace = "security")
    def onUserLogin(AuthenticationSuccessEvent loginEvent){
        log.error "We appeared to have logged in a user: ${loginEvent.authentication.principal.username}"
    }

}

With our Listener annotation marking this method as a listener in the security namespace, the Event Bus will match the method name to the event name, and pass in the argument. Of course, you could do all this with native Spring Security Events with custom code and  handlers, but I really like the was Event Bus is shaping up as a general Grails eventing infrastructure which can be used across your application.

I’d imagine that as the Security features within Platform Core develop, you’ll probably see the security plugins raise these kind of events natively on the bus, but for now, this is a cute little way to glue everything together.

[Read More]

Noob's Guide to Guava: ToStringHelper()

After several years hiatus from the raw Enterprise Java space (I’ve been doing lots of Grails coding), I’ve been wading back into some client work around native EE6 (porting a Grails app to EE6 was the reason for my onboard, but that’s the subject of a different post).

Why Guava?

On the way back into the EE landscape, I’ve been refreshing myself with what’s hip and happening in the space. Several of my mates pointed me at Google Guava as a nice way of working around null-handling, collection-immutability, and reducing boilderplate.

I’m basically using it as a modern Apache Commons, but it’s a lot more than that. What is immediately apparent is that there is a lot of consistency across the library, so someone has obviously given themselves to make this amazing. And many of these constructs will have an equivalent in Java 8, so you can start “living in the future” today on your current JDK.

A Better ToString()

To get started, one of the simple things I was looking for was just a nicer way to do “ToString()”. I’ve always been fond of Groovy’s Object.dump() method, and was chasing a way to output a similarly consistent output on my own stuff. Back in the day I used to use Commons ToStringBuilder with the ReflectionToString gear and was keen to see Guava’s approach.

Here’s the typical idiom using my Account object as a sample (it’s all nullsafe as you’d expect):

@Override
public String toString() {

        return Objects.toStringHelper(this)
                .add("name", username)
                .add("email", email)
                .add("created", dateCreated)
                .add("lastLogon", lastLogin)
                .toString();
}

And you’re in business. Time to have a look at the output:

@Test
public void aMuchNicerToString() {
        Account account = new Account("glen", "password", "glen@bytecode.com.au");
        String expected = "Account{name=glen, email=glen@bytecode.com.au, created=null, lastLogon=null}";
        assertEquals(expected, account.toString());
}
[Read More]

Reviewing My New Laptop: Lenovo X1 Carbon Touch

It’s been a few years since my last laptop, and the old one didn’t support Windows 8, nor was it touchscreen. So when the end of financial year rolled around, I thought it was time to jump all the bargains that were happening and pick up a touch screen laptop for the full Win8 experience.

So, um, why didn’t you just get a Macbook?

I did :-) I had one for several years around 2008-2011.  Great hardware, no doubt. But I’m not going back. I know devs love them. And they’ve always been hip. But I’ve done my time in that ecosystem.

As many of my friends know, I simply became more and more disillusioned with the direction Apple was heading and what they were about and just got rid of my Mac stuff (iMac/Macbook/iPod). To be honest, I was just a bit sick of being told things about what was good for me. Found the hardware amazing, though. Ecosystem was just a bit evil for me to stomach (at the same time I read iCon, and all my fanbois was then truly dead and buried). I was also sick of running old JDKs (not a problem now, I appreciate). So I jumped ship. And have never regretted it.

So what did you get & what are you comparing your experience to?

I picked up a Lenovo X1 Carbon Touch laptop (the high-end i7 one).  They normally retail for some around $2100 (!), but they had a $700 end of finyear special (!) which made the sticker price $1400AUD. Add $1 for a Thinkpad backpack, and you’re in business.

My most recent three laptops have been:

  • ASUS PL80J (2010-now)
  • Macbook Black (2008-2010)
  • Thinkpad (2005-2008)
    &nbsp;

Good and Bad?

I’ve been using this laptop for about a month so I have a pretty good feel for it. And it’s, without a doubt, the best laptop I’ve ever had!

[Read More]

Liquibase, LoadData, CSV and conditional data loads

I’m a huge fan of Liquibase for handing database creation and migration over the life of an app. I’ve been using it for a commercial product I work on (with many versions in the wild), and it’s been perfect for auto-upgrading client databases when they install a new version of our war file.

One area I haven’t invested enough energy in is handling the bootstrapping of reference data. Enter the loadData refactoring. This little refactoring handles the loading of reference data into your tables (great for populating your standard lookup tables with seeded values).

If you’ve never used this refactoring before, it goes a little like this…

<changeSet id="20130710-add-classification-reference-data" author="Glen" >
        <loadData 
            file="migrations/reference-data/classification.csv"
            tableName="classification"/>
</changeSet>

You feed the refactoring a .csv file of your sample data, with columns in the first row, and you’re up and running. Here’s the sample classification.csv file I’m pumping into the refactoring above:

version,abbreviation,name,weight,description
0,C,Confidential,60,Confidential
0,TS,Top Secret,80,Top Secret
0,P,Protected,50,Protected
0,S,Secret,70,Secret
0,U,Unclassified (No Security Classification),10,Unclassified
0,G,Government (Unclassified),30,Government

And that’s all grand. I’ve omitted the “id” (PK) field on this table in my csv file (which is an autoincrement Identity field in SQL Server), and Liquibase will gracefully handle all the autoincrement fields on the inserts with a problem.

But I’m late to this game, and my clients will have already populated their own reference data in some cases. What to do about a conditional load of that reference data that only fires if the table is empty? Enter the preConditions constraint.

<changeSet id="20130710-add-classification-reference-data" author="Glen" >
        <preConditions onFail="MARK_RAN">
            <sqlCheck expectedResult="0">SELECT COUNT(*) FROM classification</sqlCheck>
        </preConditions> 
        <loadData 
            file="migrations/reference-data/classification.csv"
            tableName="classification"/>
</changeSet>

And now we’re cooking with gas! If the sqlCheck fails, they must already have their own classification data setup, so I’ll just mark the changeset as run, and move on with my day. Exactly what I was after! Hope it saves you some time…

[Read More]

Exploring the Grails Cache Plugin: Evicting Multiple Caches

The more recent version of Grails bundle a cute little Cache plugin that abstracts some of the Cache classes built into Spring 3.1. For the common use cases, you can simply make use of the @Cacheable annotation, and then make use of @CacheEvict when you need to clean things out. But this sample code demonstrates what to do when you need to evict several caches on a  single method call (for instance, because your changing the underlying data that may have been cached in several different calcs).

If you haven’t played with the Cache plugin before, here’s the skinny. Imagine you have a controller or service that performs a couple of  expensive operations on some shared dataset (you are going to refactor it into a service, right? :-). Here’s our skeleton placeholder:

package hubbub

import grails.plugin.cache.CacheEvict
import grails.plugin.cache.Cacheable
import java.util.concurrent.atomic.AtomicInteger

class CounterController {

    static defaultAction = "invalidatingMethod"

    static AtomicInteger counter = new AtomicInteger()

    @Cacheable("myCache")
    def expensiveMethod1() {

        // imagine the massive query from hell
        render "The latest value is ${counter.incrementAndGet()}"

    }

    @Cacheable("myOtherCache")
    def expensiveMethod2() {

        // imagine another massive query from hell
        render "The latest value is ${counter.incrementAndGet()}"

    }

    @CacheEvict(value=['myCache','myOtherCache'], allEntries=true)
    def invalidatingMethod() {
        // Something that would invalidate the cache... like a DB update
        render "The caches have been cleared"
    }
}

So our expensiveMethod1() and expensiveMethod2() have been marked @Cacheable. This means that Grails will intercept the calls, to these method, catch the return values and squirrel them off to the Cacheing infrastructure (in memory by default, so it will be reset on JVM restart).  Next time you call the method, Grails will returned the cached value (which saves you all that processing time).

In the scenario above, I’m using two different caches with two different names. I’m then using the annotation on invalidatingMethod() to clear an array of cache names in one hit! I’m not sure that’s covered in the current docs, I had to go hunting through the source. But at least it’s now google-able!

So, I’ve made my calls to each of my cached methods and confirmed they are returning cached values, for instance. :

  1. http://localhost:8080/hubbub/counter/expensiveMethod1 » The latest value is 1

  2. http://localhost:8080/hubbub/counter/expensiveMethod2 » The latest value is 2

  3. http://localhost:8080/hubbub/counter/expensiveMethod1 » The latest value is 1

  4. http://localhost:8080/hubbub/counter/expensiveMethod2 » The latest value is 2
    Imaging I then made method calls my invalidating method, and you can see how the cache is operating on the data (or copy and paste and try it at home for even more XP)

  5. http://localhost:8080/hubbub/counter/invalidatingMethod » The caches have been cleared

  6. http://localhost:8080/hubbub/counter/expensiveMethod1 » The latest value is 3

  7. http://localhost:8080/hubbub/counter/expensiveMethod2 » The latest value is 4

  8. http://localhost:8080/hubbub/counter/expensiveMethod1 » The latest value is 3

  9. http://localhost:8080/hubbub/counter/expensiveMethod2 » The latest value is 4
    So the first invocation to the cached method after the caches have been cleared repopulates the cache with the new value. Awesome!

This new lightweight caching is a very cool feature of Grails 2.x line and you should definitely checkout the docs to see way you can configure those caches to be persistent, overflow, etc.

Happy Caching!

(Regular shameless plugin: If you want to find out more about what’s new in Grails 2.x, make sure you checkout the MEAP of Grails in Action 2 which is now on the Manning Site and for which we’ll soon be releasing the plugins chapter which covers Caching and other goodness).

[Read More]

Extracting the raw XML of an element using Commons Digester

I’ve recently had to parse out some semi-structured xml and marshall it into an object graph. I’d normally use JAXB in a heartbeat but the random, schemaless design of this particular large xml doc (full of random reuse of tag names inside other tags as you’ll see) made that pretty much impossible.

So I was originally thinking of doing it all by hand in StaX using the XmlEventReader. After all, it’s build into modern Java platforms and gives you the freedom to do what you want. But there’s the small matter of writing your own state-tracking using Stacks or whatnot.

The other night at  our local Canberra JUG we were talking about how great Commons Digester was for this stuff back in the day. Well, I figured I revisit it and it turns out Digester3 was just the ticket for my little problem. If you’re interested in a tutorial, there’s a great one here.

But one FAQ remained. I needed to slurp out a few of the nested nodes in the xml as an xml string. The docs are pretty lean on such things, but it turns out there’s plenty of magic in the framework to help you out.

First, you’ll need to take advantage of the NoteCreateRule object which invoke your parsed object with an xml Element of the matched node:

 forPattern("manual/part/chapter/section/controlsTitle/block/controls/block/content").
    addRule(new NodeCreateRule()).then().setNext("setDescriptionFromXml");

Once you have a handle to that bad boy, it’s just a matter of adding a method to your target bean object that takes such a beast. A little help from Stack Overflow, and I can turn that xml into a String and strip out the tags for my own nefarious reasons…

  // http://stackoverflow.com/questions/1219596/how-to-i-output-org-w3c-dom-element-to-string-format-in-java
    public void setDescriptionFromXml(Element element) throws Exception {
        TransformerFactory transFactory = TransformerFactory.newInstance();
        Transformer transformer = transFactory.newTransformer();
        StringWriter buffer = new StringWriter();
        transformer.setOutputProperty(OutputKeys.OMIT_XML_DECLARATION, "yes");
        transformer.transform(new DOMSource(element), new StreamResult(buffer));
        String str = buffer.toString().replaceAll("\\<.*?\\>", "").trim(); // strip all XML tags
        setDescription(str);

    }

Anyways, I thought it was worth writing up the process in case you ever need to use Commons Digester to get at the raw xml of a portion of your parse tree.

[Read More]

A Lesser Known Grails Tag: g:external

Working on refreshing the “tasty views and layouts” chapter for Grails in Action 2.0 and came across the gem that is the g:external tag.

Grails 2.0 introduced this cute little tag called <g:external> for that very common case of linking to CSS, JavaScript and favicons. Back in the old days, you used to use some kind of “resource” link, perhaps as a method call for brevity (or in the even older days you might have used a createLinkTo tag, but that’s showing my age):

<link rel="stylesheet" href="${resource(dir:'css',file:'hubbub.css')}" />

But these days, <g:external> is the tag for you! It will sense whether you’re linking to css, javascript, some kind of image (for a favicon), or that crazy Apple-icon-specific-thing, and generate the appropriate <link> tag for you. Behold the magic of external:

<g:external dir='css' file='hubbub.css'/>

This will generate the full <link> text you need, including the appropriate context for your app:

<link href="/hubbub/static/css/hubbub.css" type="text/css" rel="stylesheet" 
       media="screen, projector" dir="css" file="hubbub.css" 
       contextPath="/hubbub"/>

But the truly wonderful part of the little gem of a tag (as you’ll notice in the generated code above) is that it is resources-aware. That means that you get cache-able goodness of the resources plugin, along with all the static-mapping magic that exposes to you.

There is also a uri version of the tag has a little less ceremony where you link context relevant content and it will be scooped up and re-written, however it didn’t seem to happen for me on 2.2.0…

<g:external uri='/css/hubbub.css'/>
[Read More]

Has my File finished copying to my uploads directory?

So your Java app is scanning an uploads directory for files that the user will copy in (perhaps via a Windows share). The only snag is that the files can be very large, and you don’t want to start processing a partially uploaded file. What to do?

So, today’s challenge: finding a way to tell if a given File has completed copying to the upload directory or is still in the process of being copied. A colleague pointed me at nio, and we threw together something to get the job done (we already knew that File.exists() and File.canRead(), so your effort may need to be a little more robust than this one, but this will get you started):

   private boolean hasFinishedCopying(File file) {

        FileInputStream fis = null;
        FileLock lock = null;
        try {
            fis = new FileInputStream(file);
            FileChannel fc = fis.getChannel();
            lock = fc.tryLock(0L, Long.MAX_VALUE, true);
        } catch (IOException ioe) {
            return false;
        } finally {
            if (fis != null) {
                try {
                    fis.close();
                } catch (IOException ioe) {
                    // give up...
                }
            }
        }
        return lock != null;
    }

The magic you need to be aware of is that third boolean argument to tryLock() on a FileChannel. That says “I want to try to get a shared lock on this file for reading and I under someone else might be writing at the moment”. That’s just my scenario! (And without that shared switch you’ll end up with a NonWritableChannelException).

There’s probably a better way of accomplishing this task, but I thought I would at least blog up one option that we’ve tested to work, so that I can Google this later (since I am sure this is a problem I faced before!).

Happy locking!

&nbsp;

[Read More]

Getting TomEE working with JBoss Developer Tools 6

I’ve spent the day playing around with TomEE 1.5 plus and I have to say that I’m very impressed. The server starts up in a heartbeat, I could happily deploy my Glassfish EE6/PrimeFaces/JPA2 maven war to it with no app config changes to the app (bar a resource-ref). That’s pretty impressive since it’s using a completely different JPA provider, EJB container, and JSF implementation! Go the TCK!

Just for putting the cream on top, the brief smoke test I did will JMeter showed that it is likely to perform with ample headroom under my anticipated load.

The one snag I did have was getting it integrated into JBoss Developer Studio (basically a customised Eclipse). Even though there are great instructions on the TomEE site, I was a bit lost as to exactly which windows that the text was describing.

So here’s the skinny..

Open up the Server window and add a new Tomcat 7 server, giving it the path to your Tom EE installation. Follow the wizard and live the default lifestyle.

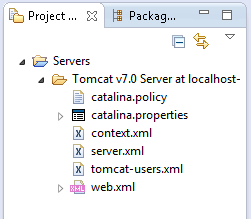
After that you’ll get a Servers twisty that appears under project in the Project Explorer window (normally the big window on the far left in the default implementation). When you fold out that server, you’ll see that it’s only got the tomcat config files (no tomee.xml or any of the other tomee specific configs). Without those you’ll get weird errors about mapping your JPA providers to HSQLDB or My Data Source or some other bizarre default.

dev-studio-project

&nbsp;

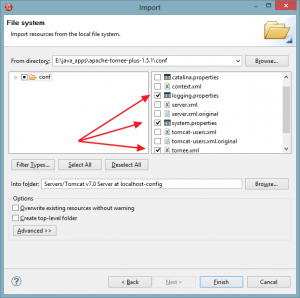
So what you’ll need to do is right click on the “Tomcat v7.0 Server” entry above, and select /Import…/General/File System/ and select the logging.properties, system.properites and tomee.xml entries. With those inplace, your JBoss Develop Studio can happily spark up TomEE right inside the IDE.

eclipse-adding-files-window

[Read More]

Reviewing my Personal Tech Goals for 2012

Well, I started 2012 with list of tech goals for 2012, and since it’s Jan 1st, it’s probably time for a small retrospective to see how I went.

  • Grails 2.0 Deep Dive. Did ok on this one. I’ve spend most of the year working full time on a big commercial Grails application, and this year I definitely levelled up my commercial development. In particular, I’ve done a lot of work with evolving schemas in a deployed commercial product using the db migrations plugin, written a truckload of Spock tests, and applied some tricky corner cases in Spring Security Active Directory integration. Also did lots with the new Resources plugin, and had plenty of fun with Elastic Search.  Somewhere in there I wrote the first half of Grails in Action 2nd Ed, and am looking forward to knocking off my remaining chapters early this year. In terms of going deeper, have really enjoyed reading Burt’s hardcore book, and Jeff and Graeme’s new book should be out soon too..
  • GUI Applications. I had a couple of Swing client projects slated for this year, but only one of them happened. Turns out Swing was just as complex as I remembered it :-). To be fair, if Java SE had the Events stuff from CDI built in, I think I’d find things a lot more attractive.
  • Integration Testing. Did some tinkering with Geb this year, but didn’t really make it to the place where I wanted to get to. Need to circle back on this one this year.
  • JBoss. Yes indeed. Really connected with our local Aussie JBoss folk this year, and they are an awesome bunch. Really strong hacker culture in that org, right down to the grass roots. Going to be doing a lot more with them in 2013 and really looking forward to connecting up with a few more of the players in that space. And to play with Arquillian in anger.
  • MongoDb. Didn’t happen this year. I’m really excited about the schemaless model of Mongo, just didn’t come across a project this year that would have had significant benefit from it. Might be time to cook up a hobby project in 2013, just to get dirtier hands.
    So, overall, I learned a ton this year, but didn’t really end up targeting the area I thought I would. All part of the journey, eh?

In the next post, I’ll outline what’s on my learning list for 2013. But I’m still stewing on what I’m going to commit to… but I think the theme will all be around “lean” and stripping things right back to basics.

Hope you all have an Amazing 2013 filling the world with awesome software!

Glen.

[Read More]

Using Apache Shiro with JSF

&nbsp;

Update: BalusC has done an amazing post about Shiro/JSF. Head over there instead!

I know very little about JSF2, and even less about Apache Shiro, but both have been on the learning list for a while, so this blog will document up how to get them working together from beginner’s eyes. Be gentle. I’ve deployed the sample to JBoss OpenShift while I’m experimenting, if you’d like to take it for a spin.

First, you’ll need a basic shiro.ini file which you can dump in your standard /WEB-INF directory. Here’s a scratcher to get you started which will protect our “protected.xhtml” file and redirect the user to the “login.xhtml” file.

[main]
authc.loginUrl = /login.xhtml
authc = org.apache.shiro.web.filter.authc.PassThruAuthenticationFilter
securityManager.rememberMeManager.cookie.name = demoRememberMe

[users]
admin = secret

[roles]
admin = *

[urls]
/index.xhtml = anon
/protected.xhtml = authc

&nbsp;

Couple of bits of magic about. The most important one is that you need to be using the PassThruAuthenticatorFilter when you’re working with JSF (which I found out about here). JSF will do magic stuff with your html INPUT element names, so you won’t be able to use the standard Shiro form filters that know about username, password, rememberMe form elements. I’ve also customised the “rememberMe” cookie name in the above, just because I was keen to explore how you do that!

With our config in place, next stop is to make the changes in web.xml to ensure that the Shiro filter fires. This is all standard Shiro stuff, no special JSF interplace required:

<filter>
        <filter-name>ShiroFilter</filter-name>
        <filter-class>org.apache.shiro.web.servlet.ShiroFilter</filter-class>
    </filter>
    <filter-mapping>
        <filter-name>ShiroFilter</filter-name>
        <url-pattern>/*</url-pattern>
        <dispatcher>REQUEST</dispatcher>
        <dispatcher>FORWARD</dispatcher>
        <dispatcher>INCLUDE</dispatcher>
        <dispatcher>ERROR</dispatcher>
    </filter-mapping>
    <listener>
        <listener-class>org.apache.shiro.web.env.EnvironmentLoaderListener</listener-class>
    </listener>

&nbsp;

[Read More]

Tuning Android Battery Life with BetterBatteryStats

Using Better Battery Stats, I’ve managed to nearly double my battery life to 3 days, and I”m pretty darn happy! Indulge my bragging for a bit, and you might get a few ideas that might work for you too!

These days I’m using a Galaxy Nexus mobile phone which I have flashed to the latest Factory Image (worth doing if you’re still stuck on 4.0.x - totally safe these days and completely legit). The phone is great, but I’ve been stuck with a day and a half of battery life, which just isn’t enough for my liking.

If I have a look at the built in battery stats, I’m seeing something like:

Battery Life before Tuning

&nbsp;

Well, a day and a half is pretty cool. But what exactly is “Google Services” and why is it taking so much of my battery? So I set out on a journey to find exactly where all that battery was going. After a bit of googling, a lot of people were recommending blowing $3 on Better Battery Stats to see exactly where all that battery was going.

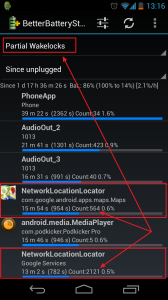
Better Battery Stats will tell let you in on Partial Wakelocks (apps that are stopping your phone going into deep sleep and saving tons of battery). Best of all, it operates passively off standard phone events, so gathering stats costs you no battery life at all. It will only start gathering after your first charge, but since that was happening every day, it was no problem :-)

So, first look at where things are going:

FirstLookAtWakeStats

&nbsp;

[Read More]

Reflections On Running a Git Course...

Last week I sat down with a dozen people to run them through a basic Git Training Course. I would have said I was “Git Intermediate” going in, and have a learned a ton in the preps, so there’s nothing like training people to sharpen your skills!

The audience were all Java and Dotnet developers, most with some revision control experience, some with real-world Git experience. I developed the course with a more experienced Git developer, who was supporting me on the day with deep-dives and examples (which was awesome - love the dual trainer thing, good for the class too).

Let’s get Meta. So what did I learn about how people learn Git?

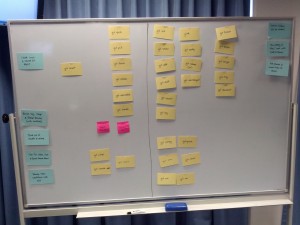
  • We covered about 30 commands during the course of a 7 hour day (zoom in on the training board picture that we were walking through above), and I was surprised that I use nearly all of those commands every day (so the Git feature set is much broader than your typical SVN/CVS flow).
  • Git Internals are so “wafer-thin-below-the-surface” that you might as well teach how Git works from the start. Next time I’ll use a desk workflow with paper cards to discuss how DAGs hang together after the first module of playing. I like what this guy did, and I would like to try that with index cards.
  • Teaching people the Reflog early really helps them to get that things are very safe with Git, much safer than with anything else they’ve used - and that a commit really is immutable (regardless of what they hear about rewriting history/commits/etc). That knowledge actually gives you confidence to, well, rewrite history. :-)
  • Remoting is really where people started to fall off the wagon. They could live with a staging area, but the idea of local and remote repos really needed a lot more exercises and a lot more experimenting. Pull/Fetch and diffing from master..origin/master… wat? Well.. Next round of courseware will spend more time on that. And more exercises.
  • Learning how Reset really works also requires a really solid mental model of the Git DAG. Next time I will spend more time on paper away from the terminal working through all this on index cards before we get lost in the weeds.
  • People were more comfortable with rebasing than I thought. In fact, interactive rebasing was totally fine, and rebasing master to branch seemed to have a pretty clear mental model for most people.
  • We taught everything through Git Bash, and I probably would offer Posh Git as a good albeit slow Powershell alternative for the guys who were new to Unix.
  • Giving people concrete ideas on team Git workflows (such as GitHub Flow) is really helpful when you have so much flexibility. Need to workshop that one a bit hard for next time.
    Anyways, once I fix up a few corrections to the notes we used on the day, I'll post them here (not sure they'll be very useful to you since I'm certainly no [Matt/Tim](http://training.github.com/), but it might give you ideas for exercises to introduce to your own teams).
    Rebase early, and love the Reflog!
    **Update:** Slides below. Download them to get the PPT with the training notes on the speaker slides.
    ** [Git One Day Training Notes](http://www.slideshare.net/glen_a_smith/git-one-day-training-notes "Git One Day Training Notes") ** from **[glen_a_smith](http://www.slideshare.net/glen_a_smith)**
[Read More]

Testing UrlMappings params in Grails

I’m busy working on the UrlMappings section of Grails in Action (2nd Edition) and have been discovering a few interesting tidbits that don’t turn up in the docs (at least not that I know of, at time of writing).

One of them relates to testing more complex UrlMapping setups. For instance, here are a couple of interesting examples to get you thinking:

class UrlMappings {

    static mappings = {
         // other mappings here...

        "/timeline/chuck_norris" {
            controller = "post"
            action = "timeline"
            id = "chuck_norris"
        }

        "/users/$id" {
            controller = "post"
            action = "timeline"
        }

    }
}

So we have two mappings in place here. Both map to controller and action, with one setting a static id of “chuck_norris” and the other parsing the $id off the url. In both cases we end up inside the Post controller and fire off the timeline action.

To test this bad boy, we want to test the mapping to action and controller, but we also want to test the params that we have either (a) parsed out of the url; or (b) set within the mapping block.

The magic you need to know is that assertForwardUrlMapping takes an optional closure as the final parameter. Inside that closure, you assign the values to expect to receive, and UrlMappingsUnitTestMixin will do the heavy work of comparison for you. Enter the Spec….

import com.grailsinaction.PostController
import grails.test.mixin.Mock
import grails.test.mixin.TestFor
import spock.lang.Specification

@TestFor(UrlMappings)
@Mock(PostController)
class UrlMappingsSpec extends Specification {

    def "Ensure basic mapping operations for user permalink"() {

        expect:
        assertForwardUrlMapping(url, controller: expectCtrl, action: expectAction) {
            id = expectId
        }

        where:
        url                     | expectCtrl| expectAction  | expectId
        '/users/glen'           | 'post'    | 'timeline'    | 'glen'
        '/timeline/chuck_norris'| 'post'    | 'timeline'    | 'chuck_norris'
    }

}

Just remember, the Closure takes a set of assignments (id = ‘abc’) not comparisons (id == ‘abc’) and you’re in business.

We have a truckload of tests like these in Grails In Action 2, so if you’re into this style of experimenting, you’re going to enjoy reading the samples.

Go forth and test your complex mappings!

[Read More]

A few cool Git Books and Learning Resources

I’m in the process of putting together a basic one-day git training course for both our consulting team and one of our friendly clients at the moment.

Even though I’ve been tinkering with Git for ages, I originally learned Git properly by methodically working through Tim McCullough and Tim Berglund’s awesome video series which I would recommend them to anyone keen to get a good quickstart into the space. I’m still no expert, but I’m now pretty solid on all the basics, and know enough to take others through the same.

I appreciate not everyone is into screencasts, so I thought I’d also make some notes about some great free and commercial resources available to level up your Git skills.

Some Books Worth A Look…

First of all, Scott Chacon’s Pro Git book is free, and awesome! You can’t go past the price, and it’s got really great coverage of all the common things that you are likely to want to do in day-to-day Git. I found it wasn’t the “Deep Dive” that I was after for the next level (times when you really want the back story of what Git is doing under the covers).

&nbsp;

If you want to go nuclear on how Git works, there is no better book to own than Version Control with Git, 2nd Edition. This book is all sorts of amazing when it comes to reallly understanding how things work under the cover. I’m still working my way through it, but it’s a seriously well put together book. Just go get it!

I’ve also got an older Pragmatic Programmer title on Pragmatic Version Control Using Git, which is a nice lightweight intro to Git, but is showing its age now, and you’re better off Levelling up to the Git book above.

[Read More]

Grails Scratcher of the Day: Global GORM Constraints

&nbsp;

Ok. So the title tells you something, but it might not get you through this scratcher. Here’s the domain class that we’re working with:

package constrainme

class Book {

    String title
    String author

    static constraints = {
        title blank: false
        author blank: false
    }
}

&nbsp;

Now let’s imagine we want to make sure those constraints are working properly…

package constrainme

import grails.test.mixin.*
import org.junit.*
import spock.lang.*

@TestFor(Book)
@Mock(Book)
class BookSpec extends Specification {

    def "A global GORM nullable overrides a local object blank constraint"() {

       given:
       Book book = new Book()
       mockForConstraintsTests(Book, [book])

       when:
       def isValid = book.validate()

       then:
       !isValid
       book.hasErrors()

    }
}

&nbsp;

This test will fail. And this exact scenario owned most of my morning. You know that blank trumps nullable, so there’s no way I should be able to pass that blank object in there. Right? Wrong…

Little did you know, I was busy supplying some GORM defaults to the whole project. Normally all object properties are not null by default, but you can override that in Config.groovy by a little, well, config:

grails.gorm.default.constraints = {
    '*'(nullable: true)
}
[Read More]

Grails, Floating Point Precision, Migrations and Double Trouble

I can’t remember how I survived before the Database Migration plugin.  Being able to deploy upgrades to client site without having to worry about which old version they were previously running is very comforting. It’s the second plugin I install after Spock.

There are a few rough edges that I have encounter with the output of good old dbm-gorm-diff, and always end up doing a little bit of hand editing. Sometimes it generates FKs that are too long for my final target. Sometimes it creates varchars when I was after longvarchars and so on. But mostly it gets it right, so I don’t mind a little hand editing.

Yesterday I was bitten by an issue surrounding floating point precision. I was feeding in some floating point data of fairly small precision (eg 123.45) and was getting back floating point with massive precision (123.450275639457236394). Wat?

Turns out this one is a known issue with the Liquibase and the Db Migration plugin which others have hit too. But when you see the behaviour in the your app, it can be hard to know where to start.

The thing you need to know is that if you specify a property of type Double in your Grails app, the migration plugin with generate a db script of:

column(name: "my_double_field", type: "double precision(19)")

Even if you haven’t specified any scale constraint on the field in your domain class. And that precision can cause havoc with what Liquibase generates into your db tables. On SQL Server, that will generate a field as a “real” rather than a “float”. And the kicker will be if your looking at the data inside SQL Management Studio, it will look fine :-). But as soon as you query it from jdbc, then hang on to your screen real estate for the floating point precision!

So the fix is pretty simple. Just edit your migration file and lose the precision:

column(name: "my_double_field", type: "double")

So keep it real. And checkout out your generated SQL!

[Read More]

CSS3 Media Query Cage Match: Nexus 7 vs Galaxy Nexus

I’ve spend the day doing battle with CSS3 Media Queries determining a Galaxy Nexus from a Nexus 7 and I’ve finished the day winning!

I’ve been doing some consulting for a client on a project that uses PhoneGap and jQuery Mobile along with a little bit of Ajax to scrape data from the client’s production site. Nice little project and we’ve managed to support Android, Blackberry & WinPhone with a single set of assets.

The only trouble came when we encountered the new Galaxy Nexus and Nexus 7 handsets. The resolution of these handsets is just amazing. The designer had separate layouts for “tablet” interactions and “phone” interactions, so it wasn’t just a matter of looking at the device-width and seeing what res we had.

The old queries relied on catching smartphone using such a device-width mechanism:

@media only screen and (max-device-width: 569px)

But that’s not nearly enough these days if you’re walking that road. The max-device-width on the Galaxy Nexus is something like 1184 which puts it into tablet territory! I’ve been doing a bunch of testing using ResponseJS’s awesome tester site but was feeling a bit all-at-sea on how to cope with layout given the resolutions.

If you’re not up to speed with this stuff it’s worth have a read of The Complete Idiot’s Guide to Pixels on Mobiles, which finally explained to me the different between max-width and max-device-width.

The upshot is that, for now, I’m moving to:

@media only screen and (max-width:600px)

As my current catcher for Android Smartphones (and avoiding the tablets). After Android’s target density scaling,  I think the Galaxy Nexus presents with a 360 x 519 which is explained nicely in this amazing article on Nexus CSS deets (Compared with 601 x 880 on the Nexus 7) so I’ve got plenty of breathing space for a while.

[Read More]

Grails in Action 2.0 is going MEAP any day! (No, really!)

We’ve been talking about it for a while… and it’s finally actually happening. After nudging from our awesome Dev Editor, Peter and I have actually got our acts into gear about getting this project rocking! Manning have started the engines to release the new Grails in Action 2.0 MEAP and you’ll likely see something within the two days at http://manning.com/grailsinaction.

After discussing the release plan with our Dev Editor, and being rightly challenged to “release early, release often”, we’re keen to regularly ship content out the door rather than wait any longer than we have to. Great for us, since we get feedback, great for you since you can get stuff in your hands earlier.

For that reason, we’ll probably just release 2 or 3 chapters first up, keep a few up our sleaves for a second monthly release, while we charge on to the rest. That will smooth the release cycle, and give you guys regular content. We’re both committing regular time to the writing task, so the updates will be regular.

At this point in time we are focusing on Parts I & II and have chapters on intro, groovy primer, scaffolding, domain modelling all done, with controllers nearly done, with all the new querying goodness next on the list. Not sure what will actually get put in the first MEAP cut, but whatever you get, you can rest assured that the remainder will be “in the pipe” for a monthly release.

For those interested in “the vision”, here’s a sneak peak at the web copy for the book promo at this point in time….

Description:

Grails 2 is an open-source, full-stack web framework on the JVM powered by the Groovy dynamic language. With a focus on “getting stuff done”, you’ll be spending more of your time building amazing web solutions for clients or your company, and eliminate all the dead time you used to spend configuring, recompiling, restarting and rewriting your existing Java webapps.

In this book you’ll master Grails 2.1 core skills by applying Test-Driven Development techniques to developing a full scale Twitter clone. Along the way you’ll learn the latest “Single Page Webapp” UI techniques, work with NoSQL backends, integrate with enterprise messaging, and implement a complete RESTful API for your services.

Peter and Glen invest all their Grails experience into this book, helping you use the most appropriate techniques and to avoid the most common pitfalls. It’s not just about using the framework but how best to use it.

[Read More]