Update: BalusC has done an amazing post about Shiro/JSF. Head over there instead!
I know very little about JSF2, and even less about Apache Shiro, but both have been on the learning list for a while, so this blog will document up how to get them working together from beginner’s eyes. Be gentle. I’ve deployed the sample to JBoss OpenShift while I’m experimenting, if you’d like to take it for a spin.
First, you’ll need a basic shiro.ini file which you can dump in your standard /WEB-INF directory. Here’s a scratcher to get you started which will protect our “protected.xhtml” file and redirect the user to the “login.xhtml” file.
[main]
authc.loginUrl = /login.xhtml
authc = org.apache.shiro.web.filter.authc.PassThruAuthenticationFilter
securityManager.rememberMeManager.cookie.name = demoRememberMe

[users]
admin = secret

[roles]
admin = *

[urls]
/index.xhtml = anon
/protected.xhtml = authc
Couple of bits of magic about. The most important one is that you need to be using the PassThruAuthenticatorFilter when you’re working with JSF (which I found out about here). JSF will do magic stuff with your html INPUT element names, so you won’t be able to use the standard Shiro form filters that know about username, password, rememberMe form elements. I’ve also customised the “rememberMe” cookie name in the above, just because I was keen to explore how you do that!
With our config in place, next stop is to make the changes in web.xml to ensure that the Shiro filter fires. This is all standard Shiro stuff, no special JSF interplace required:
<filter>
        <filter-name>ShiroFilter</filter-name>
        <filter-class>org.apache.shiro.web.servlet.ShiroFilter</filter-class>
    </filter>
    <filter-mapping>
        <filter-name>ShiroFilter</filter-name>
        <url-pattern>/*</url-pattern>
        <dispatcher>REQUEST</dispatcher>
        <dispatcher>FORWARD</dispatcher>
        <dispatcher>INCLUDE</dispatcher>
        <dispatcher>ERROR</dispatcher>
    </filter-mapping>
    <listener>
        <listener-class>org.apache.shiro.web.env.EnvironmentLoaderListener</listener-class>
    </listener>
With all our web.xml filters in place, the next step is to write up the basic JSF login form. Here’s my minimalist version of login.xhtml:
<?xml version='1.0' encoding='UTF-8' ?>
<!DOCTYPE html PUBLIC "-//W3C//DTD XHTML 1.0 Transitional//EN" "http://www.w3.org/TR/xhtml1/DTD/xhtml1-transitional.dtd">
<html xmlns="http://www.w3.org/1999/xhtml"
    xmlns:h="http://java.sun.com/jsf/html"
    xmlns:f="http://java.sun.com/jsf/core">
<h:head>
    <title>Login Page</title>
</h:head>
<h:body>

    <h:form>
        <h:messages />

        <h2>Login Page</h2>
        <p>You can use "admin" and "secret" to login.</p>
        <h:panelGrid columns="3">

            <h:outputLabel for="username" value="User Name:" />
            <h:inputText id="username" value="#{loginController.username}"
                required="true" label="Username" />
            <h:message for="username" />

            <h:outputLabel for="password" value="Password:" />
            <h:inputSecret id="password" value="#{loginController.password}"
                label="Password" />
            <h:message for="password" />

            <h:outputLabel for="rememberMe" value="Remember Me:" />
            <h:selectBooleanCheckbox id="rememberMe"
                value="#{loginController.rememberMe}" />

            <h:commandButton action="#{loginController.authenticate()}"
                value="Login" />

        </h:panelGrid>
    </h:form>
</h:body>
</html>
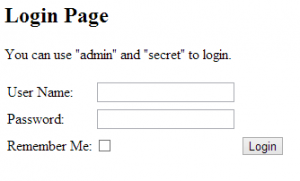
Nothing too special there. We have fields for our username, password and rememberMe, just need to wire it up to our loginController, and life will be good. Here’s what it looks like so far:
Next, we’ll need to whip up our loginController JSF backing bean with elements for our username, password, rememberMe, and, of course, logic to do the actual authentication. Here’s my rough one to get you started:
package au.com.bytecode.controller;

import java.util.logging.Logger;
import javax.enterprise.inject.Model;
import javax.faces.application.FacesMessage;
import javax.faces.context.FacesContext;
import org.apache.shiro.SecurityUtils;
import org.apache.shiro.authc.AuthenticationException;
import org.apache.shiro.authc.UsernamePasswordToken;
import org.apache.shiro.subject.Subject;

/**
 * Simple JSF Controller demonstrating Shiro login/logout process.
 *
 * @author Glen Smith
 */
@Model
public class LoginController {

    String username;
    String password;
    boolean rememberMe = false;

    private static final Logger log = Logger.getLogger(LoginController.class
            .getName());

    public String authenticate() {

        // Example using most common scenario of username/password pair:
        UsernamePasswordToken token = new UsernamePasswordToken(username,
                password);

        // "Remember Me" built-in:
        token.setRememberMe(rememberMe);

        Subject currentUser = SecurityUtils.getSubject();

        log.info("Submitting login with username of " + username
                + " and password of " + password);

        try {
            currentUser.login(token);
        } catch (AuthenticationException e) {
            // Could catch a subclass of AuthenticationException if you like
            log.warning(e.getMessage());
            FacesContext.getCurrentInstance().addMessage(
                    null,
                    new FacesMessage("Login Failed: " + e.getMessage(), e
                            .toString()));
            return "/login";
        }
        return "protected?faces-redirect=true";

    }

    public String logout() {

        Subject currentUser = SecurityUtils.getSubject();
        try {
            currentUser.logout();
        } catch (Exception e) {
            log.warning(e.toString());
        }
        return "index";
    }

    public String getUsername() {
        return username;
    }

    public void setUsername(String username) {
        this.username = username;
    }

    public String getPassword() {
        return password;
    }

    public void setPassword(String password) {
        this.password = password;
    }

    public boolean getRememberMe() {
        return rememberMe;
    }

    public void setRememberMe(boolean rememberMe) {
        this.rememberMe = rememberMe;
    }

}
You probably don’t want to really log usernames and passwords to the console :-), but it’s helpful when you’re learning how things are hanging together. The core part of the deal is the authenticate() method. In here, you’re doing a Shiro authenticate using the standard API hooks.
I’ve also put together a logout() method above too. Helpful when testing your cookies out :-). I call this from the protected.xhtml page via a commandButton to force the logout:
<?xml version='1.0' encoding='UTF-8' ?>
<!DOCTYPE html PUBLIC "-//W3C//DTD XHTML 1.0 Transitional//EN" "http://www.w3.org/TR/xhtml1/DTD/xhtml1-transitional.dtd">
<html xmlns="http://www.w3.org/1999/xhtml"
      xmlns:h="http://java.sun.com/jsf/html">
    <h:head>
        <title>Secret Page</title>
    </h:head>
    <h:body>
        This is a super secret page.
        <h:form>
            <h:commandButton action="${loginController.logout()}" value="Logout"/>
        </h:form>
    </h:body>
</html>
So there you have it! Shiro integration with JSF turns out to be pretty straightfoward once you’re aware of that PassThruAuthenticator trick! Next on my explore list is to get Shiro DB realm integration happening with JPA2! Should be some interesting CDI challenges there…
Once again, if you’d like to take it for a spin, I’ve deployed it to the JBoss cloud to see what that experience was like (very straightforward so far, topic for another post). Also good to know that Shiro runs fine on cloud services!
Edit: Even better if you use WebUtils to remember the page that was being intercepted when the user was sent to login as discussed here.
Something like this would do the trick….
log.info("Submitting login with username of " + username
        + " and password of " + password);

try {
    currentUser.login(token);
    FacesContext fc = FacesContext.getCurrentInstance();
    fc.responseComplete();
    HttpServletRequest request = (HttpServletRequest) fc.getExternalContext().getRequest();
    HttpServletResponse response = (HttpServletResponse) fc.getExternalContext().getResponse();
    String fallbackUrl = "/index.xhtml";
    WebUtils.redirectToSavedRequest(request, response, fallbackUrl);
    return null;
} catch (Exception e) {
    // Could catch a subclass of AuthenticationException if you like
    log.warning(e.getMessage());
    FacesContext.getCurrentInstance().addMessage(
            null,
            new FacesMessage("Login Failed: " + e.getMessage(), e
                    .toString()));
    return "/login";
}
Happy JSF/Shiro-ing!
