It’s one thing to be hacking on your Grails project when you’re offline on a plane/train/public transport. You have grails -offline for that challenge. It’s another thing when you journey into a client that has no internet access. That’s a new level of challenge.
It might be that your client is on an air-gapped Network (for tender evaluation, security, etc), or it might be that the internet access is blocked for maven central, grails central, or some other key artifact site (don’t laugh… I could tell you stories about one particular client who’s stateful-inspecting proxy modified jar files as they were download and inserted its own .class files to catch any Main-Class META-INF entries. Eeek!).
Step 1: How To Catch and Cache Those Dependencies
If you’re writing a Grails app, you’ll want to use plugins. But with Grails plugin dependencies management, getting the plugin’s zip file is only half the story. You’ll also need those artifacts that the plugin itself needs to pull down. You could muck around with your ~/.grails and ~/.ivy directories until the cows come home, but still end up with something that doesn’t work once you setup your CI server inside the client site, or worse.
What you’re really after is an Artifact proxy. Some kind of service that you can point Grails at and get it to push all its jar and plugin requests through. That way, you can point your CI build, and all your other dev workstations to one box and get everything slurped down just as it should be.
There are two popular options for such beasts: Artifactory and Nexus. Grails folk seem to have adopted Artifactory as their preferred repo manager. I’ve never really understood why (perhaps you could enlighten me in the comments?). I have always preferred Nexus myself, since it stores all the artifacts on the filesystem in the native Maven repo format (which makes them easy to navigate and copy), and I’ve found the UI more approachable (of course, as in all things personal prefs, YMMV).
Step 2: Installing Nexus and Getting It Configured for Plugins
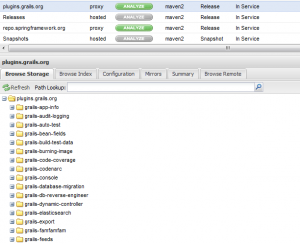
After you’ve installed Nexus, you’ll want to setup a new Proxy Repo that points to http://plugins.grails.org/ and also a Spring Framework Repo that point to their Enterprise Repo (screenshot of the plugins.grails.org setup below, rinse and repeat for the Enterprise Repo URL).
Step 3: Add your new repos to the “Public Repository” Group
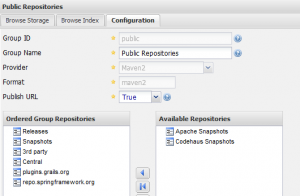
Once you have your two new proxies setup to catch your artifacts, you’ll want to group them all behind a single “virtual” repository so that you have a one stop shop for pulling in the artefacts you need. Nexus calls these “Group” other repositories, and since it ships with the “Public Repository” as a built in group, so let’s just extend that.
Then you will want to add those two new proxies to your Public Repository group (screenshot of config tab). With that in place, you can funnel all your maven/grails/ivy requests through http://192.168.1.7:8082/nexus/content/groups/public/ and catch everything you need (your ports and hostnames may vary :-)
Step 4: Configuring the Grails side to use Nexus
Now the final bit of magic: pointing your Grails app to use your proxy. Peter wrote about this kind of thing back in the day, but it’s worth refreshing you here.
You’ll want a BuildConfig.groovy mod…according to one of the more recent threads about such things.
repositories {
        // Standard Grails repos
        grailsPlugins()
        grailsHome()
        grailsRepo "http://192.168.1.7:8082/nexus/content/repositories/plugins.grails.org/"
        mavenRepo "http://192.168.1.7:8082/nexus/content/groups/public/"
        //grailsCentral()

        // No Maven repos, please.. Just proxy everything you need to the ivy cache
        //mavenLocal()
        //mavenCentral()

    }
In the case above I’ve commented out grailsCentral, and added grailsRepo and mavenRepo entries for our Nexus server. I’ve also commented out my local maven entries since I want to make sure that we catch absolutely everything.
With those config changes in, it’s time to install every plugin you are likely to need inside, then clean and run your app to make sure that everything is sucked down through Nexus.
Congratulations, you now have everything you need to work air-gapped!
Step 5: Zip it up and take it with you!
Since Nexus writes all your artefacts to a nicely structured filesystem, it’s easy to navigate via the Nexus UI to make sure you have all the artefacts and plugins that you’ll need offline.
The easiest way to get it all onsite is just zip up your entire sonatype-work directory and take it with you. You can transport that directory onto your client site, then unzip and standup an internal Nexus repo that has everything you need to install and run your Grails app!
Step 6: Using install-plugin when you’re offline
You won’t be able to just do an “install-plugin fields” or “list-plugins” once you’re inside and offline, since Grails can’t workout the latest version without consulting the plugins website. But you can install the specific version you downloaded by issuing an “install-plugin fields 1.0” or whatever. Let me know if there’s a better way to cache that stuff for offline use.
You are now ready to roll! Go forth and be productive offline!
Oh. And if you’re looking for a fun Grails book to circulate amongst your team, we’re full-steam ahead working on Grails In Action 2.0 - Stay tuned for a MEAP release in the next few weeks!

